 Save
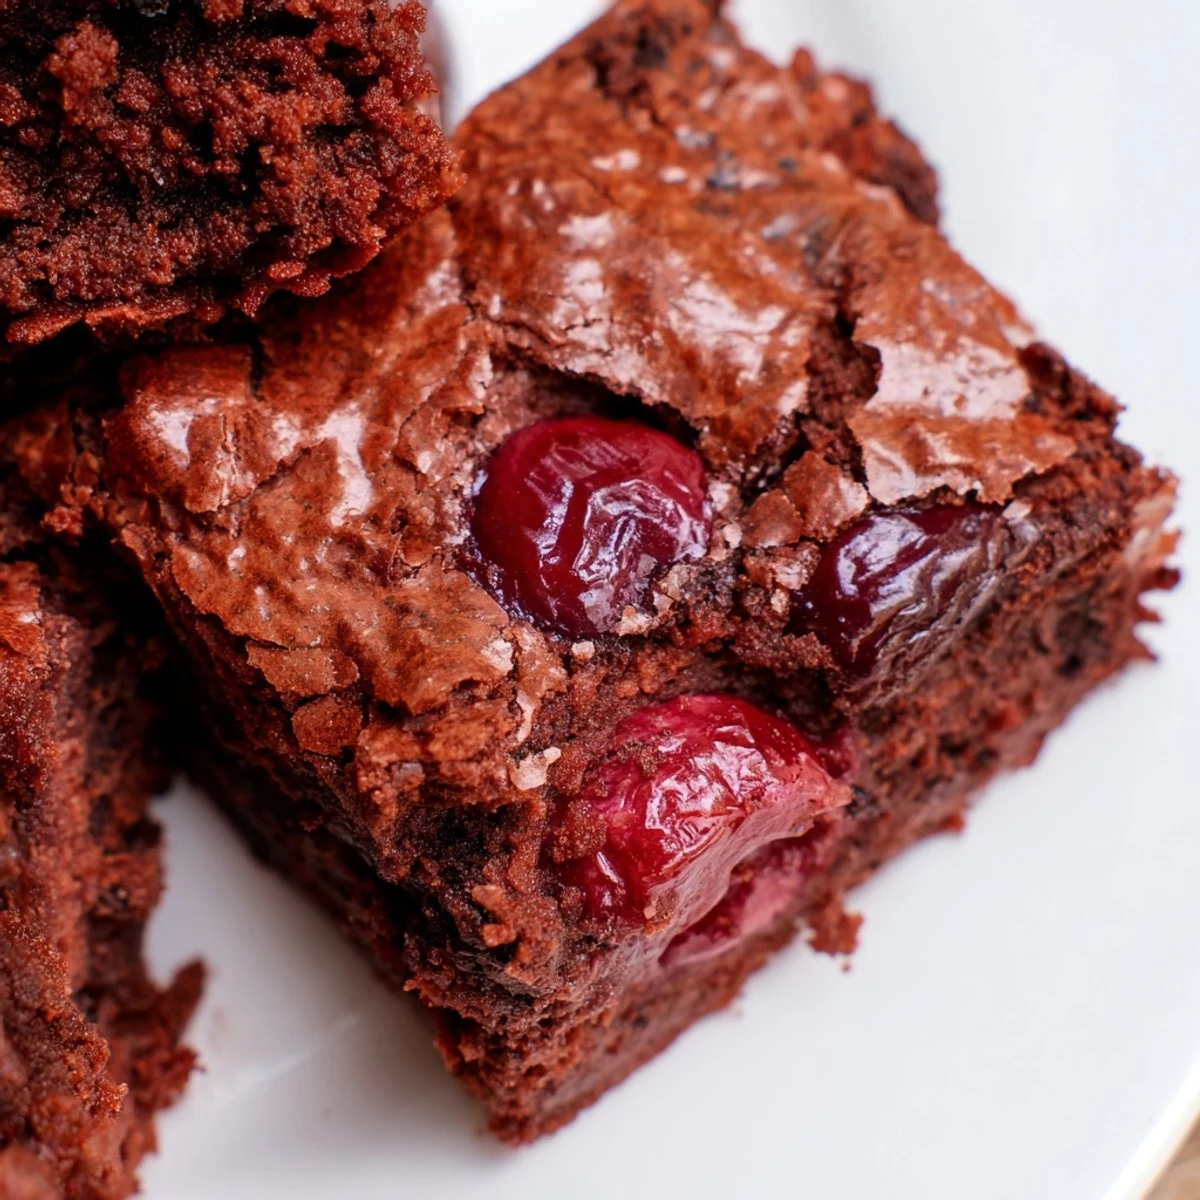
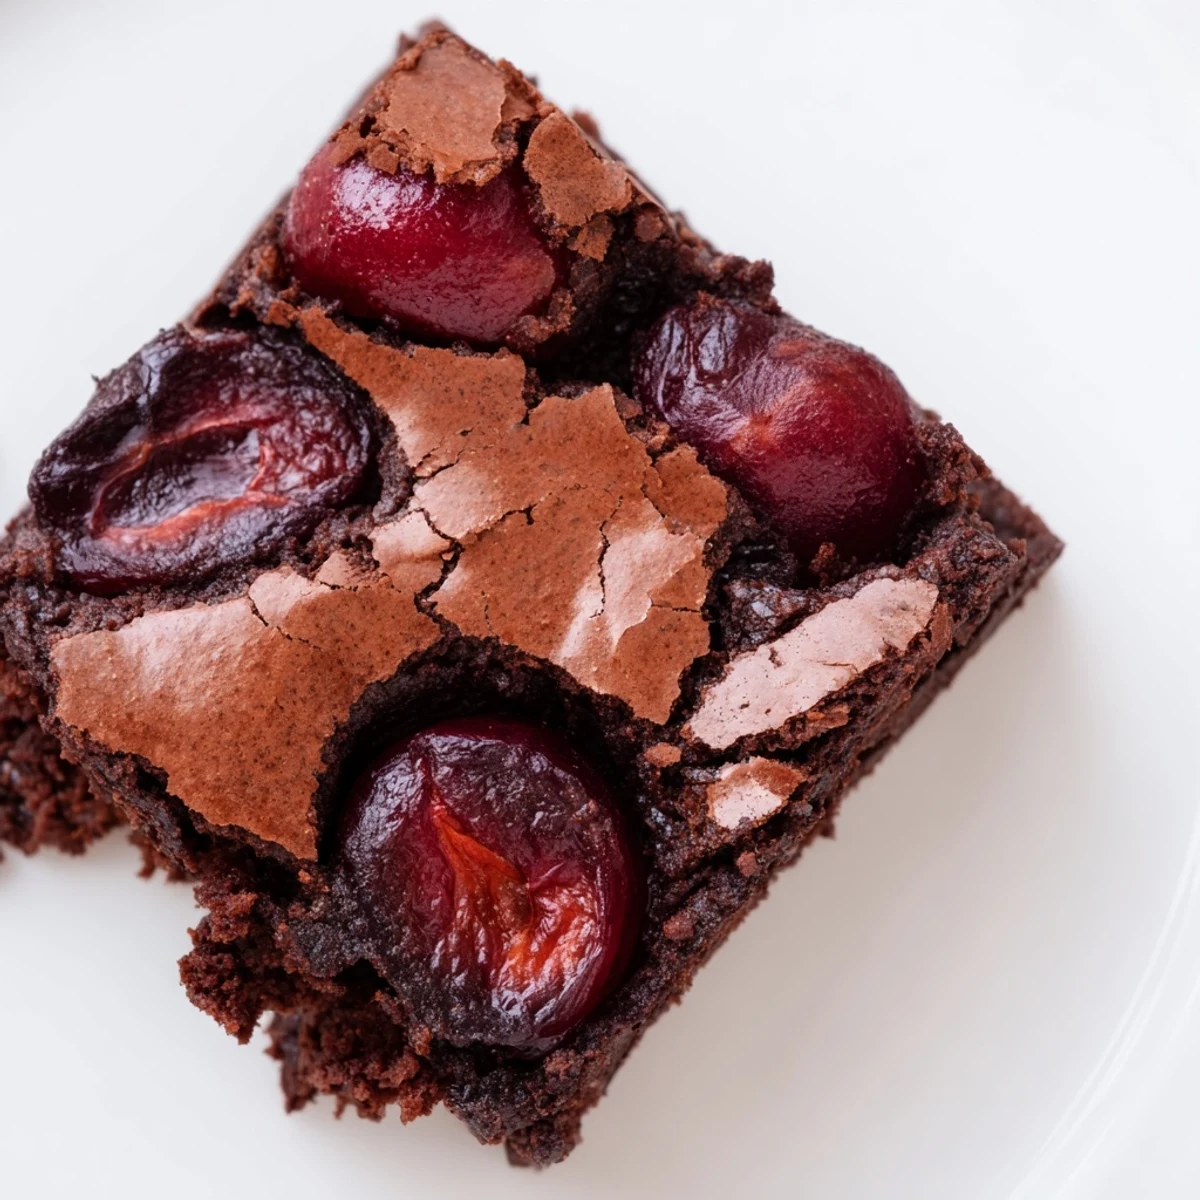
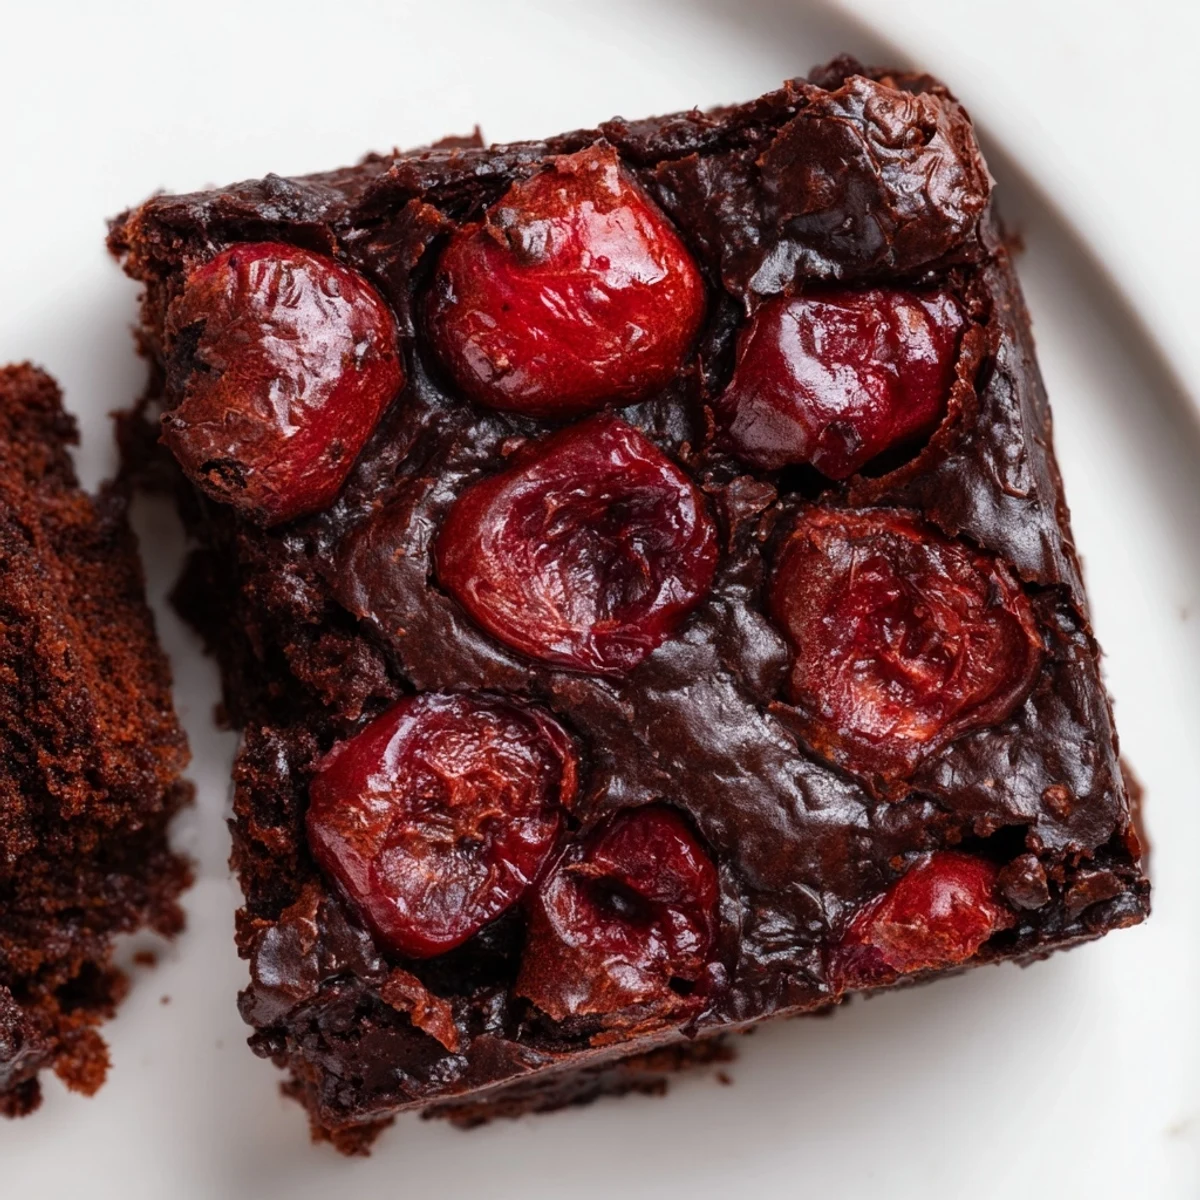
Save These indulgent chocolate brownies feature a moist, fudgy texture from melted bittersweet chocolate and butter, with bursts of sweet-tart flavor from roasted cherries scattered throughout. The fruit gets caramelized in the oven first, concentrating their natural juices before being folded into the dense cocoa batter.
Baking at 350°F produces edges that are slightly crisp while the center remains irresistibly gooey. The roasted cherries add moisture and create pockets of jammy sweetness that contrast beautifully with the intense chocolate base.
Serve them warm with vanilla ice cream for maximum indulgence, or let them cool completely for clean, neat squares that hold their shape. The finished treat balances richness from the chocolate with bright fruit notes, making it perfect for summer gatherings or special occasions.
The first time I saw ruby-red cherries bubbling away in my oven, halfway through making these brownies, my kitchen smelled like a cozy bakery in July. I'd originally planned to just fold fresh cherries into the batter, but something told me to roast them first. Those fifteen minutes transformed everything. The cherries became jammy and concentrated, their sweetness deepening into something that perfectly cuts through rich chocolate.
Last summer, I made a batch for my neighbor's potluck and watched them vanish in under ten minutes. Her husband claimed he didn't even like chocolate with fruit, but I caught him going back for seconds. There's something about the combination of warm, roasted cherries and dark chocolate that feels unexpectedly sophisticated.
Ingredients
- 1 1/2 cups fresh cherries: Pitting and halving these takes some patience, but that burst of juice when you bite into a roasted cherry makes every sticky finger worth it
- 1 tbsp granulated sugar: Just enough to coax the natural sugars out of the cherries and help them caramelize in the oven
- 1 tsp vanilla extract: I add this to the cherries before roasting, and it creates this aromatic perfume that fills the whole kitchen
- 1/2 cup unsalted butter: Room temperature butter melts more evenly with the chocolate, though I've definitely used cold butter in a pinch and lived to tell the tale
- 6 oz bittersweet chocolate: Chop it yourself instead of using chips, the chunks melt into beautiful puddles and create those glossy streaks in the finished brownies
- 3/4 cup granulated sugar and 1/4 cup brown sugar: The combination gives you that crackly, shiny top that everyone fights over
- 2 large eggs: Let these come to room temperature first, or they might seize up when you add them to the warm chocolate mixture
- 2/3 cup all-purpose flour: Sift it to avoid any stubborn lumps, but don't overwork the batter or these will turn cakey instead of fudgy
- 2 tbsp unsweetened cocoa powder: This deepens the chocolate flavor without making the brownies too dense
Instructions
- Roast the cherries first:
- Crank your oven to 400°F and line a baking sheet with parchment, then toss those pitted cherries with sugar and vanilla until they're coated. Spread them out so they're not touching too much, and let them roast for about 15 minutes until they're bubbling and starting to caramelize at the edges.
- Get your pan ready:
- Turn down the oven to 350°F while you grease an 8-inch square pan and line it with parchment, leaving those little wings hanging over the sides. This trick makes lifting out the whole batch feel like magic, no more stuck corners.
- Melt the chocolate base:
- Set a heatproof bowl over simmering water, making sure the bottom doesn't actually touch the water, and melt the butter and chopped chocolate together. Stir it gently until it's smooth and glossy like liquid silk, then set it aside to cool for a few minutes.
- Build the batter:
- Whisk both sugars into the warm chocolate mixture, then beat in the eggs one at a time until they're fully incorporated. Stir in the vanilla and salt, then sift in the flour and cocoa, folding everything together just until the white streaks disappear.
- Bring it all together:
- Fold in most of those roasted cherries, saving the prettiest ones for the top, then pour the batter into your prepared pan. Smooth it out with an offset spatula, scatter the remaining cherries over the surface, and bake for about 25 minutes until a toothpick comes out with moist crumbs clinging to it.
 Save
Save My daughter now requests these for every special occasion, and I've learned to double the cherry portion because she eats half of them straight off the roasting pan. They've become our rainy day baking tradition, the kind of recipe that makes the house feel warmer just from being in the oven.
Getting The Texture Right
The trick to these brownies is pulling them from the oven when that toothpick still has moist crumbs attached. I've learned through many slightly overbaked batches that the residual heat continues cooking them for at least ten minutes after they leave the oven. Trust the process, even if they seem slightly underdone.
Making Them Ahead
These actually taste better the next day, if you can manage to save any that long. The flavors meld together and the cherries settle into the batter, creating pockets of jammy sweetness. Store them in an airtight container at room temperature, and they'll stay fudgy for three to four days.
Serving Ideas
A warm brownie with a scoop of vanilla bean ice cream is pretty much perfection, especially when the ice cream starts melting into those roasted cherry pockets. For dinner parties, I like to serve them with a dollop of crème fraîche and a few fresh cherries on top.
- Dust with powdered sugar right before serving for a bakery finish
- Toast leftover roasted cherries and sprinkle over vanilla ice cream
- Wrap individual brownies in parchment for the perfect lunchbox treat
 Save
Save There's something deeply satisfying about a recipe that transforms simple ingredients into something that feels like a special occasion. These brownies have become my go-to for bringing a little joy to ordinary Tuesdays.
Recipe FAQs
- → Can I use frozen cherries instead of fresh?
-
Yes, frozen cherries work well in this dessert. Thaw them completely and drain thoroughly before roasting to remove excess ice crystals. Pat them dry with paper towels to prevent adding too much moisture to the batter. Roasting time may need a few extra minutes to achieve proper caramelization.
- → How do I know when the brownies are done baking?
-
Insert a toothpick into the center—it should come out with moist crumbs rather than wet batter. The edges should be set but the center may still look slightly glossy. Overbaking will result in a cakey texture rather than the desired fudgy consistency. Start checking at 25 minutes.
- → Can I make these ahead of time?
-
Absolutely. The finished squares keep well in an airtight container at room temperature for up to 3 days. For longer storage, refrigerate for up to a week or freeze individually wrapped portions for up to 3 months. Bring chilled brownies to room temperature before serving for the best texture.
- → What type of chocolate works best?
-
Bittersweet chocolate with 60-70% cocoa content provides the ideal balance of sweetness and intensity. Higher quality baking bars melt more smoothly than chips, which contain stabilizers that can affect the texture. Avoid milk chocolate as it will make the final result too sweet and less rich.
- → Can I add nuts to the batter?
-
Yes, chopped walnuts or pecans complement the chocolate and cherry flavors beautifully. Fold in about ½ cup of toasted nuts along with the roasted cherries. The nuts add crunch and a subtle nutty flavor that enhances the overall richness. Pecans pair particularly well with the fruit notes.
- → Why roast the cherries first?
-
Roasting concentrates the cherry flavors and creates natural caramelization, adding depth that raw cherries lack. The heat draws out excess moisture so the fruit doesn't make the batter soggy, while developing a jammy consistency that distributes evenly throughout the chocolate. This extra step makes a noticeable difference in the final result.